Build a Sonar-Based Alert System with Arduino | Motion Detection + LCD Display + Buzzer
Table of Contents
Introduction
In this tutorial, you will learn how to build a sonar-based alert system using Arduino, which integrates motion detection with real-time feedback through an LCD display and buzzer. This project is suitable for beginners and provides practical applications in robotics and home security.
Step 1: Gather Your Components
Collect the following materials needed for the project:
- Arduino Uno
- HC-SR04 Ultrasonic Sensor
- SG90 Servo Motor
- 16x2 LCD Display with I2C Module
- Green & Red LEDs
- Buzzer
- Breadboard
- Jumper Wires
- USB Cable
- 220Ω Resistors
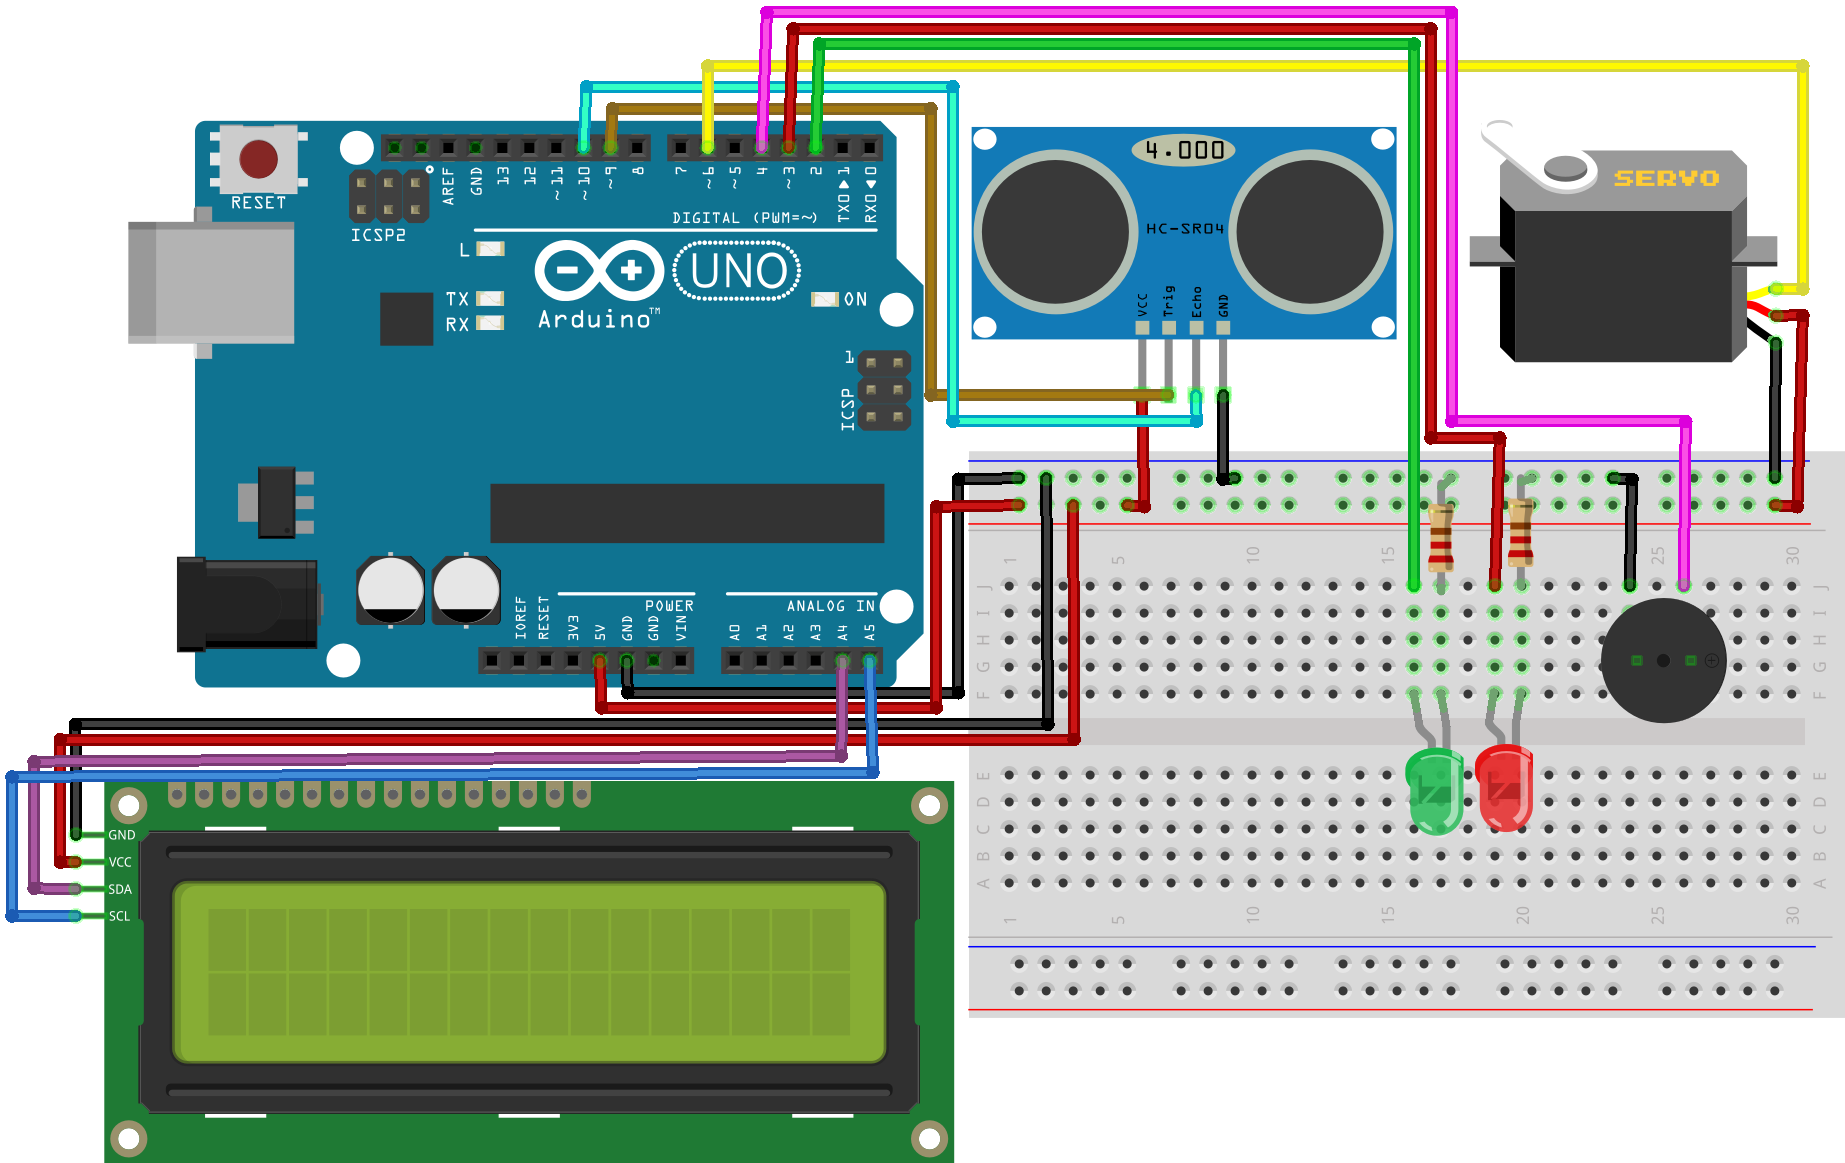
Step 2: Set Up the Circuit
Follow these wiring steps to connect the components:
-
HC-SR04 Ultrasonic Sensor:
- VCC to 5V on Arduino
- GND to GND on Arduino
- Trig to digital pin 9 on Arduino
- Echo to digital pin 10 on Arduino
-
SG90 Servo Motor:
- VCC to 5V on Arduino
- GND to GND on Arduino
- Signal to digital pin 11 on Arduino
-
16x2 LCD Display:
- Connect the I2C module to the LCD.
- SDA to A4 on Arduino
- SCL to A5 on Arduino
-
LEDs and Buzzer:
- Connect the green LED to digital pin 6 with a 220Ω resistor in series to GND.
- Connect the red LED to digital pin 7 with a 220Ω resistor in series to GND.
- Connect the buzzer to digital pin 8 and GND.
-
Power Up:
- Finally, connect the Arduino to USB for power.
Refer to the circuit diagram for clarity: Circuit Diagram.
Step 3: Install Arduino IDE and Libraries
- Download and install the Arduino IDE from Arduino's official website.
- Ensure the necessary libraries for the LCD display are installed. You can find the libraries in the Library Manager within the IDE.
Step 4: Write the Arduino Code
Copy the following code into the Arduino IDE:
#include <LiquidCrystal_I2C.h>
#include <Servo.h>

LiquidCrystal_I2C lcd(0x27, 16, 2);
Servo myServo;

const int trigPin = 9;
const int echoPin = 10;
const int servoPin = 11;
const int buzzerPin = 8;
const int greenLedPin = 6;
const int redLedPin = 7;

void setup() {
  Serial.begin(9600);
  lcd.begin();
  myServo.attach(servoPin);
  pinMode(trigPin, OUTPUT);
  pinMode(echoPin, INPUT);
  pinMode(buzzerPin, OUTPUT);
  pinMode(greenLedPin, OUTPUT);
  pinMode(redLedPin, OUTPUT);
}

void loop() {
  long duration, distance;

  digitalWrite(trigPin, LOW);
  delayMicroseconds(2);
  digitalWrite(trigPin, HIGH);
  delayMicroseconds(10);
  digitalWrite(trigPin, LOW);

  duration = pulseIn(echoPin, HIGH);
  distance = (duration * 0.034) / 2;

  lcd.setCursor(0, 0);
  lcd.print("Distance: ");
  lcd.print(distance);
  lcd.print(" cm ");

  if (distance < 10) {
    digitalWrite(redLedPin, HIGH);
    digitalWrite(greenLedPin, LOW);
    digitalWrite(buzzerPin, HIGH);
  } else {
    digitalWrite(redLedPin, LOW);
    digitalWrite(greenLedPin, HIGH);
    digitalWrite(buzzerPin, LOW);
  }

  myServo.write(0);
  delay(1000);
  myServo.write(180);
  delay(1000);
}
Upload the code to your Arduino board.
Step 5: Test the System
- After uploading the code, test the system by moving an object within the sensor's range.
- Observe the LCD display to see the distance measurements.
- The buzzer and LEDs should activate when an object is detected within a specified distance.
Conclusion
You have successfully built a sonar-based alert system using Arduino! This project not only enhances your understanding of motion detection and Arduino programming but also demonstrates practical applications in security and robotics. Explore additional features or modifications, such as integrating Wi-Fi capabilities or using different sensors for enhanced functionality. Happy building!